
In this blog I will be covering adding and removing buttons on digital and IP phones for IP Office. I will be covering the basic button options that are used most of the time. Those are buttons like Appearance, Park, User, Twinning, Do not disturb, quick dial, and so on. There are over a 100 button options used for very specific needs that can be added in the same way but may not work without other programming. Twinning is one of those button that requires more programming (see below). For those other buttons either do your research or give us a call to assist. You can find information on this Avaya web site or the built-in help in Manager.
To change a user’s buttons go to User->(choose user)->Button Programming in Manager.
![]()
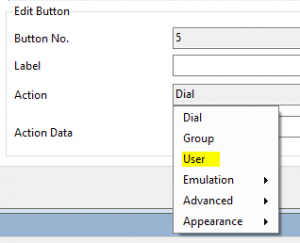
We will add new User button….but first what is the value of this kind of button? This button allows for a quick extension dial or presence information such as whether the person on the phone; set for do not disturb or has an incoming call. So in short…quite useful. Select the button you wish to use (5 in the example below) and click the Edit… button on the right.

Select the … button and choose User. Now choose the user for this button on the Action Data drop down.
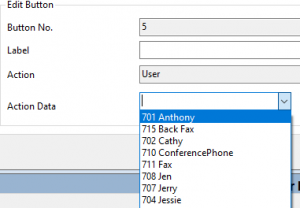
Click OK.
In this next example we will be adding another Call Appearance button but for many users at once. In some cases you may see a lock on some buttons. User Rights is where we change the locked buttons. User Rights is used to program many phones at once. All features programmed in the group will apply to all phones in the group.
Call Appearances are used to make or receive calls. So the more you have the more calls you can manage at any one time on a particular phone. It is highly recommended to have at least 2 Call Appearance buttons on digital and IP phones. If you only have 1 you cannot transfer or have manage ad hoc conference call. Select User Rights->(choose group)->Button Programming. I will use Default. Here I will use button 3.
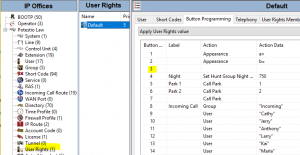
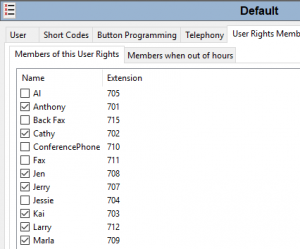
Select Edit… as before. Select … button Appearance->Appearance. To see the users affected choose User Rights Membership.
Click OK.
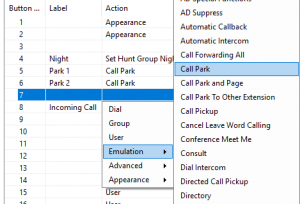
Park buttons are useful for holding calls system wide. In Button Programming select the button you want to change. Right click on the Action cell for the button and choose Emulation->Call Park. In Action Data type a numeral. Usually the next integer is used. In my case 3.

I would recommend to change the label as well (Right click on the label cell for that button). We are done.
A quick dial button is useful for very common numbers you call. You can certainly use the Contacts button but this is even faster. In Button Programming select the button you want to change. Right click on the cell and choose Dial. In action data type the digits exactly as you would dial on the phone. Add a label. Simple isn’t it.
If you do not want to receive calls temporarily then a Do not disturb is useful. In Button Programming select the button you want to change. Right click on the Action cell for the button and choose Advanced->Do not Disturb->Do not Disturb On.
Twinning is a very cool feature. To add twinning for a user requires more than just adding a button. By now you should have no problem adding the button. To turn this feature on for a user select the user and find the Mobility tab. Check Mobility Features and enter the cell phone number as you would dial it.
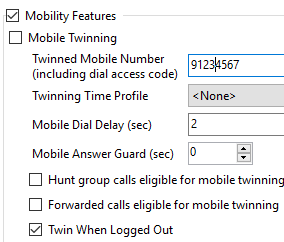
It is also a good idea to check off Twin When logged Out. The other options will depend on the user’s needs.
Well that’s all for this session. Oh, as always make sure you save your changes.